BLOG.
Tradtional Casement Windows
11th March 2012
Recently, I’ve been making some traditional windows with very thin glazing bars for a property in a conservation area in Cheshire. They are unusual in that they incorporate double glazing but look, to all intents and purposes, like traditional casements.
They are very difficult things to manufacture in that they have to been constructed in the reverse order to what you’d think.
Usually, I cut the rebates for the glazing first, then I cut the tenon is the end of each rail, next I cut the mortise and fine tune the tenon to fit, and finally I put the moulding or radius onto the finished components.
With these windows, however, a lot of the processes have to be reversed in order to avoid breakout during machining (where the timber splinters when it’s being cut or moulded), or because they are integral to an earlier process which can’t be delayed.
This is all a subtext to what I actually want to say, which is that it’s a right pain in the neck. However, the finished items (minus paint and glass) look really smart.

Laying out components prior to moulding
1. After cutting the components to size, The tenon and scribe (this is the reverse of the moulding) are cut on the spindle moulder in two passes – one for each side of the joint.

Back-side of tenon being cut (front-side and ‘scribe’ have already been cut and are face down against the board in this image
Once the joints are cut, the mortises are drilled (see previous post), and the joints are fitted.
The glazing bars for this project are very slim, 22mm, and need to be moulded really carefully and slowly to avoid breakout. In traditional construction, these bars would also incorporate a section to hold the glass. In this job, however, I’m using a ‘duplex glazing bar‘ pane which is a single IGU with intermediate metal spacer bars inserted between the two sheets of glass. These align with my timber glazing bars and make the window appear as though it is made up of multiple panes of glass, as it would have been traditionally, when it’s actually a single pane, divided into 8 smaller sections.

With small components it’s even more important that the timber is sizes accurately before being moulded.

Moulded 22mm glazing bars.
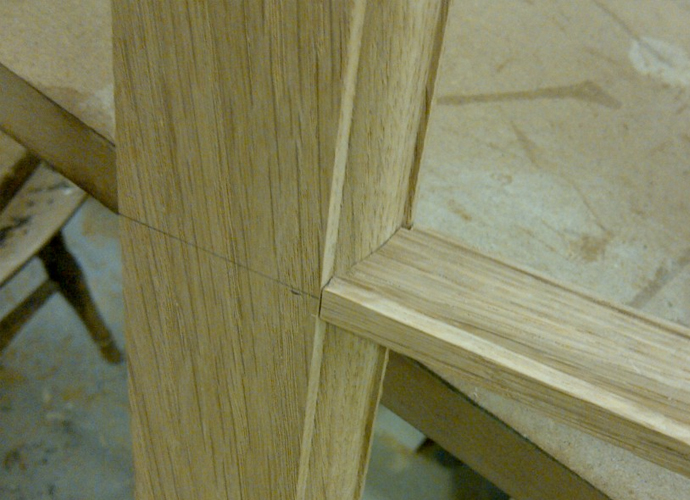
The ‘scribe’, or reverse of the moulding, is cut into the end of each bar and also the top and bottom rails of the window. The joint looks like this:

Each component is moulded, then the ‘scribe’ is cut into the end of the glazing bar so the pieces are flush when fitted together.
Now time for the glue-up.

The smaller casement laid out ready for assembly.

The dowels, which you might be able to see in the end of each glazing bar, slot into hole in the frame.
The joints are clamped and wedged as usual…

Once the tenons have been expanded with the wedges, the clamps can be removed.
And here’s the casements in there frame ready to be painted and glazed.

The left-hand casement is hinged whilst the smaller right-hand one is fixed.The mullion matches the original windows in the property
One down, twelve to go.
HM HandMade specialises in handmade furniture and interiors, conservation joinery, and bespoke contemporary timber architecture. Designed and made by hand in Cheshire
Handmade oak windows, bespoke oak casements, heritage joinery, conservation carpentry, traditional oak windows.